Introduction
Keeping your SQL Server instances updated is crucial for security, performance, and stability. In this blog, we will go through the process of applying SQL Server patches or cumulative updates (CUs) to a SQL Server Always On Availability Group. Specifically, we will upgrade from SQL Server 2022 (RTM-GDR) to SQL Server 2022 (RTM-CU13).
Pre-Check Activities
Before applying any updates, it’s essential to conduct a series of pre-checks to ensure a smooth upgrade process.
- Review Release Notes:
- Always read the release notes for the cumulative update to understand the changes and fixes included. This can be found on the Microsoft website.
- Backup Databases:
- Take full backups of all databases in the Availability Group.
BACKUP DATABASE [YourDatabase] TO DISK = 'D:\Backups\YourDatabase.bak' WITH COMPRESSION;- Check Health of Availability Group:
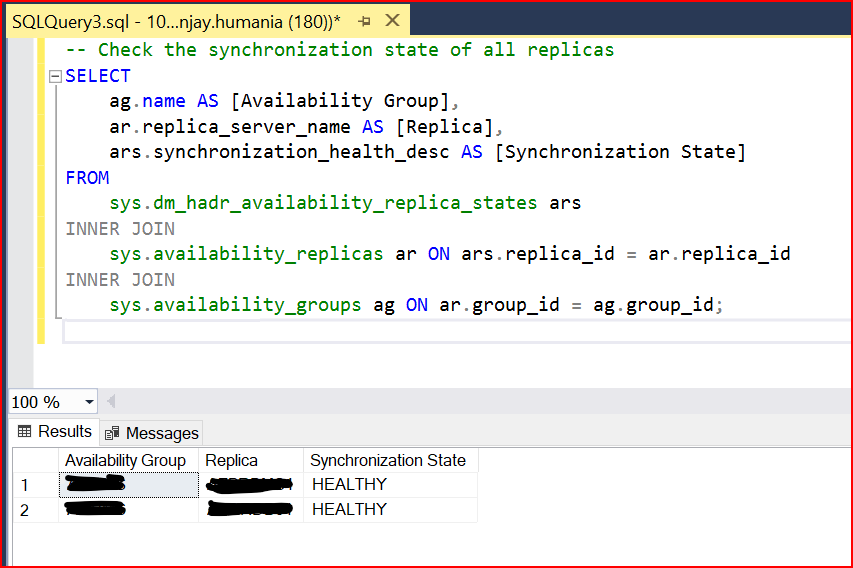
- Ensure the Availability Group is healthy before proceeding.
-- Check the synchronization state of all replicas
SELECT
    ag.name AS [Availability Group],
    ar.replica_server_name AS [Replica],
    ars.synchronization_health_desc AS [Synchronization State]
FROM
    sys.dm_hadr_availability_replica_states ars
INNER JOIN
    sys.availability_replicas ar ON ars.replica_id = ar.replica_id
INNER JOIN
    sys.availability_groups ag ON ar.group_id = ag.group_id;
- Validate Quorum:
- Ensure that the Windows Server Failover Clustering (WSFC) quorum configuration is optimal and there is sufficient node majority.
- Check Free Disk Space:
- Verify that there is enough disk space for the update.
Get-PSDrive C- Disable SQL Server Agent Jobs:
- Temporarily disable any SQL Server Agent jobs that might interfere with the update process.
Step-by-Step Update Process
Start with the Secondary Replica:
- Failover Validation:
- Ensure that failover is working properly. Perform a manual failover to another secondary replica (if available) to validate the failover process.
-- Initiate manual failover
ALTER AVAILABILITY GROUP [YourAG] FAILOVER;- Suspend Data Movement:
- Suspend data movement on the secondary replica you plan to update first.
ALTER DATABASE [YourDatabase] SET HADR SUSPEND;- Apply the Update:
- Download and apply the CU to the secondary replica. Follow the on-screen instructions of the installer.
- Find latest SQL Server patch:
- To find the latest SQL Server patch, you should visit the Microsoft Download Center or the official SQL Server support pages on Microsoft Learn.
- As of May 2024, the latest cumulative update (CU) for SQL Server 2022 is CU13, which is available for download as KB5036432. This update includes all previous fixes and improvements released for SQL Server 2022. (Microsoft Cloud) (Microsoft Learn).
- For SQL Server 2019, the latest update is CU25, which can be found as KB5033688 (Microsoft Learn).
- You can access and download these updates directly from the Microsoft Download Center or through the SQL Server section on Microsoft Learn:
These pages provide detailed instructions for installing the updates, as well as information on what issues each update addresses.
- Resume Data Movement:
- Resume data movement after the update.
ALTER DATABASE [YourDatabase] SET HADR RESUME;- Verify Synchronization:
- Ensure that the secondary replica is synchronized.
- Check the synchronization state
SELECT * FROM sys.dm_hadr_database_replica_states
WHERE database_id = DB_ID('YourDatabase');Repeat for All Secondary Replicas:
- Repeat the steps above for all other secondary replicas, ensuring each one is updated and synchronized before moving on to the next.
Update the Primary Replica:
- Failover to a Secondary Replica:
- Perform a manual failover to a secondary replica that has already been updated.
ALTER AVAILABILITY GROUP [YourAG] FAILOVER;- Suspend Data Movement:
- Suspend data movement on the old primary replica (now a secondary).
ALTER DATABASE [YourDatabase] SET HADR SUSPEND;- Apply the Update:
- Apply the CU to the old primary replica.
- Resume Data Movement:
- Resume data movement after the update.
sql ALTER DATABASE [YourDatabase] SET HADR RESUME;Fail Back (if necessary):
- If you prefer the original primary to remain the primary, failover back to it.
ALTER AVAILABILITY GROUP [YourAG] FAILOVER;Post-Check Activities
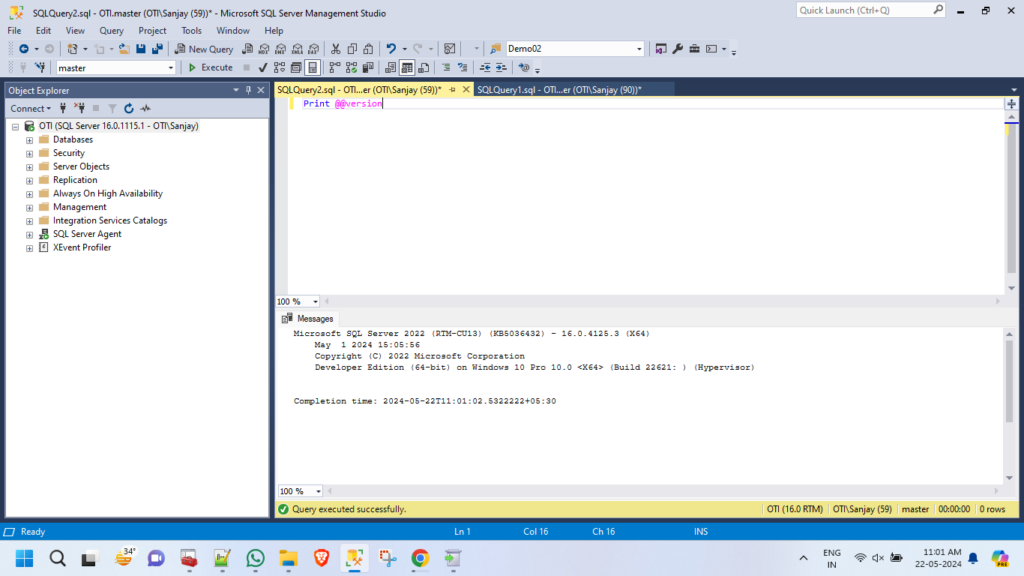
- Check SQL Server Version:
Verify that the SQL Server version is updated on all replicas.
SELECT @@VERSION;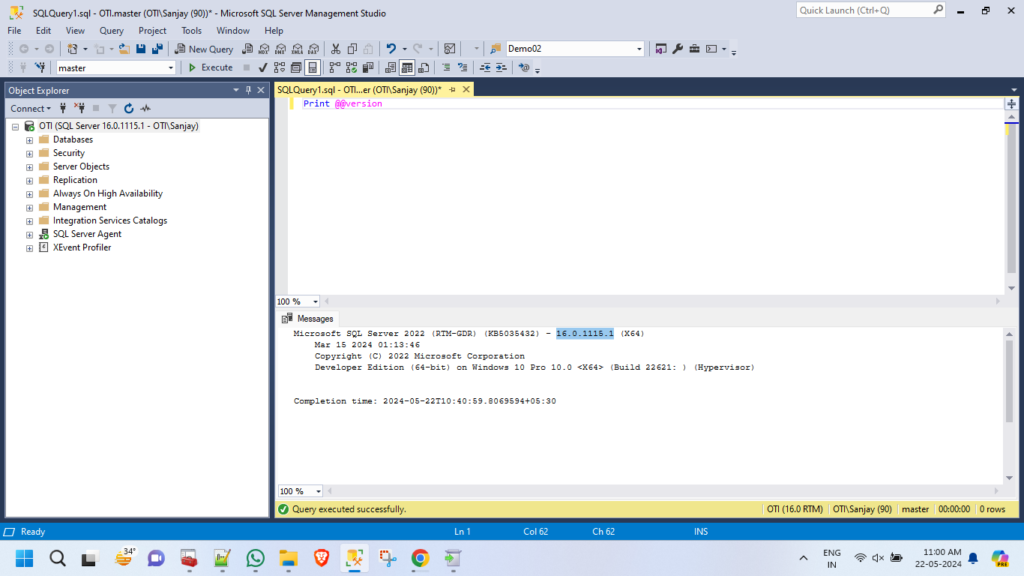
- Check Availability Group Health:
Ensure that the Availability Group is healthy and all replicas are synchronized.
-- Check the synchronization state of all replicas
SELECT
    ag.name AS [Availability Group],
    ar.replica_server_name AS [Replica],
    ars.synchronization_health_desc AS [Synchronization State]
FROM
    sys.dm_hadr_availability_replica_states ars
INNER JOIN
    sys.availability_replicas ar ON ars.replica_id = ar.replica_id
INNER JOIN
sys.availability_groups ag ON ar.group_id = ag.group_id;- Enable SQL Server Agent Jobs:
Re-enable any SQL Server Agent jobs that were disabled before the update. - Verify Application Connectivity:
Confirm that applications are properly connecting to the databases and there are no connectivity issues. - Monitor Performance:
Keep an eye on the performance and error logs to ensure there are no unexpected issues post-update.
Conclusion
Applying SQL Server patches or cumulative updates in an Always On Availability Group environment requires careful planning and execution to ensure minimal downtime and data integrity. By following these pre-check, step-by-step update, and post-check activities, you can efficiently update your SQL Server instances from SQL Server 2022 (RTM-GDR) to SQL Server 2022 (RTM-CU13) while maintaining the high availability and performance of your databases.